How To Spool A Fly Reel – Step By Step Guide
7 Minute reading time 📖 We do not use AI to create content; written by Anglers, for Anglers 🎣
Learning how to spool a fly reel is something that can be challenging to every angler the first time or two they do it, but once you get some practice you will realize it’s not that challenging at all!

We will teach you how to spool a fly reel, and how to make sure that the amount of backing you use is the perfect amount every time. No guessing and checking, and no wasted time spent going back to remove or add backing line.
Gear You Need to Spool A Fly Reel

In today’s guide, we’ll show you how to spool your new fly reel at home. Here’s what you’ll need:
- Fly Reel of Choice
- Fly Fishing Line
- Backing (I prefer 30-pound backing as it takes up space faster)
- Tape
- A cardboard box narrow enough to fit a standard Bic pen
- The bottom section of a fly rod
Make sure before spooling your fly line you have purchased the appropriate line for the type of fishing you will be doing.
For example, if you want to fish dry flies, it would not make sense to have a sinking fly line.
Preparing the Reel
Once you have gathered the above materials, the first thing to do is to take a piece of tape and attach the end of your fly line (the part you will attach the leader to) onto your reel.
Separate the spool from the reel.
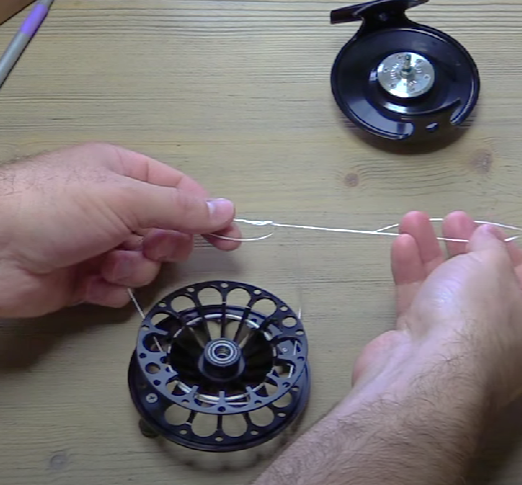
Take your backing and loop it around the reel three times to prevent it from spinning on itself. Next, tie a uni knot.
Hold the standing line, take the tag end, wrap it around three fingers, and pass it through both loops three times. Pull it tight and trim with scissors. This knot tightens more as you pull on it, so you can give it a good tug.
Setting Up the Spool
Attach the spool to the reel. Take your box and Bic pen, poke holes in each flap of the box, and slide the spool through the holes. This setup allows the spool to spin freely on the pen. Now, attach your reel to the rod.
Tensioning & Backing
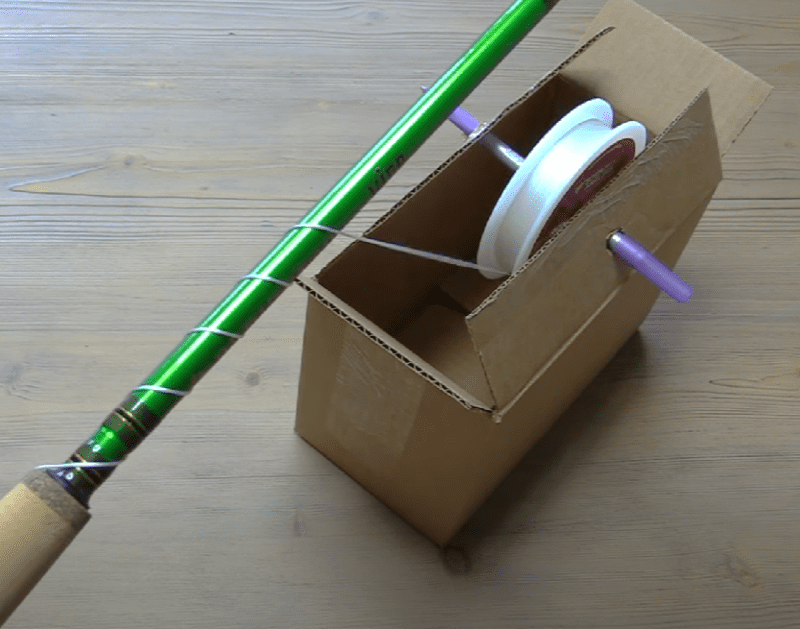
When spooling the reel, it’s important to apply some tension to prevent the backing from digging into itself. You can use your hand or fingers, but a better trick is to wrap the backing around the rod three to five times (see picture). The more you angle the rod upwards, the more tension you’ll create.
Reel slowly to avoid damaging the rod.
As you spool, move the line back and forth across the reel to ensure it’s stacked evenly. Check your reel card for the recommended amount of backing for your fly line weight.
Checking the tension – To test the tension, press on the backing. If it feels spongy and shifts under pressure, it’s too loose. It should be moderately stiff, and the wraps should stay in place when pressed.
Adding the Fly Line
To know if you’ve added enough backing, take your fly line, place it on the reel, and check the space left. You should see the lip of the spool. If there’s enough room, proceed to load your fly line.
Attach the fly line to the backing with the pre-made loop on the line. If there’s no loop, use an Albright knot. Tie a large surgeon’s loop on the backing to fit over the line spool. Once done, pass the backing through the loop on the fly line and tighten it.
Winding the Fly Line
Wind the fly line with moderate tension, stacking it evenly as you go. Unlike the backing, fly line doesn’t need tight tension, so you can wind it quickly without any issues.
Now that you have all of your fly line on your reel, you should still have some space left.
Start reeling the backing up and keep reeling until you see that you are getting pretty close to the maximum capacity of the spool.
You don’t want to overfill the reel because if the line is on there a little looser at some point in the future it can catch or rub on the reel, which is something that we don’t want because it can harm the line.

You also don’t want to be too stingy with the backing and realize that you do not have enough during a fight with a big fish. Err on the side of slightly too little, as that will prevent you from compromising your reel’s performance out on the water.
Once you have all the backing that will fit on your reel, cut the rest of the backing off. You can save this for use in the future or throw it away. It will not be necessary for this project anymore.
Final Steps
At this point, what we need to do is get the line off of your reel, so we can put it on in the correct direction (the backing should be the first line going onto your spool and the last to come off as you are pulling line out).
Another method you can do is to attach the end of the line to a tree or fence post, and then walk backward, letting out the line until the reel is empty. Once you do that, go to the end that has the backing, and attach that to your reel with a sturdy knot.
Should you be playing a fish that takes you deep into the backing, this knot will be your last connection between the line (and the fish) and you, so make sure it is a good knot. Then just start reeling all the line back up.
When you are finished reeling the line back up you should have the end of your fly line that you would attach your leader to hanging loose from the reel, ready to be strung up your favorite fly rod and cast to a hungry trout.
What you are going to need is a handheld drill and some sort of cylinder that can be attached to it. You will tape the end of the backing to this cylinder (think old line spool, with room for the fly line and the backing) and then turn on the drill, automatically unwinding all the line from your fly reel and onto the spool to keep it easy to manage.

Now take that spool out from your drill and put in another empty one.
Do the same process again, winding the line onto the spool attached to the drill and off of the spool that we just used before. This will get the line so that the end of the backing is loose and will allow you to attach the backing to the fly reel.
At this point what you can do is just reel up the line once you’ve attached the backing to the reel.
One thing you do not want to do is just strip all the line off your reel into a pile on the floor and expect to wind it back up starting from the other end.
It will almost certainly get itself into a knot during the process, and ultimately will just be a frustrating experience. Fly line backing almost always works itself into very small knots that seem to take an hour to untangle.
It is worth spending a little extra time and effort to make sure that everything goes right and that the line is organized cleanly.
Final Thoughts
If you made it to the end of this article then you should how to spool a fly reel with the perfect amount of backing!
All that’s left is to head out to a stream or river and give it a few test casts!